Yep, we did it again. A year ago we made our very first card catalog buffet, and we loved it so much we decided to make another one. Don’t worry, were not weird and have two in our house, this one was made to sell..and sell it did. We put this beauty up in our friends store Modern Manor, and it sold within three hours of being open! What a blessing! We did this one a little different. This time we only sanded and stained it, as opposed to painting and distressing it. A lot less work but we love the way it turned out!

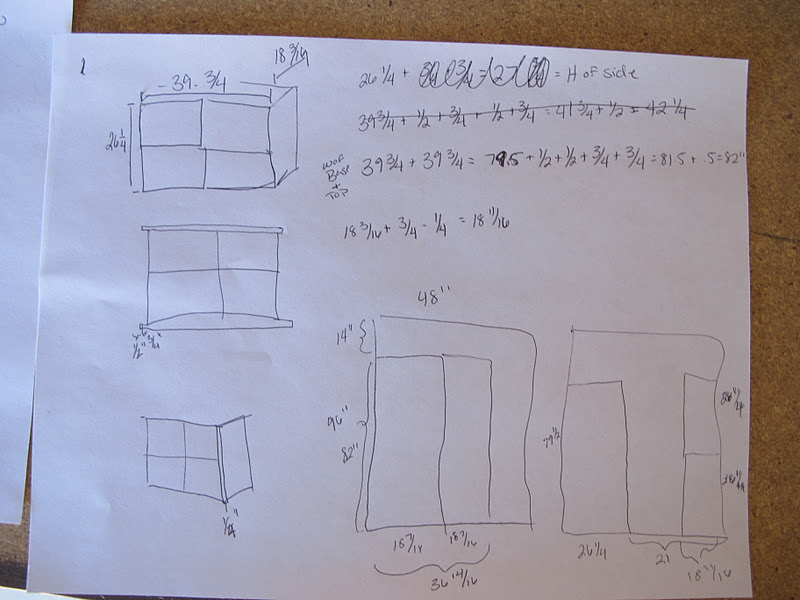
Start by being a genius. Kidding, but not really. When doing a project this large you just want to be exact on your measurements, so thats definitely where Js massive brain power comes in to play.

This is the card catalog we started with this time. We got it off of Craigslist, actually from our friends over at European Paint Finishes. If you havent been to their site, Mike and Keeley are the best furniture painters ever, they deserve to win an emmy, if painting furniture was a category.


Yep that’s right we have 8 of the card catalog sections, so a third buffet will be coming soon.
Steps:
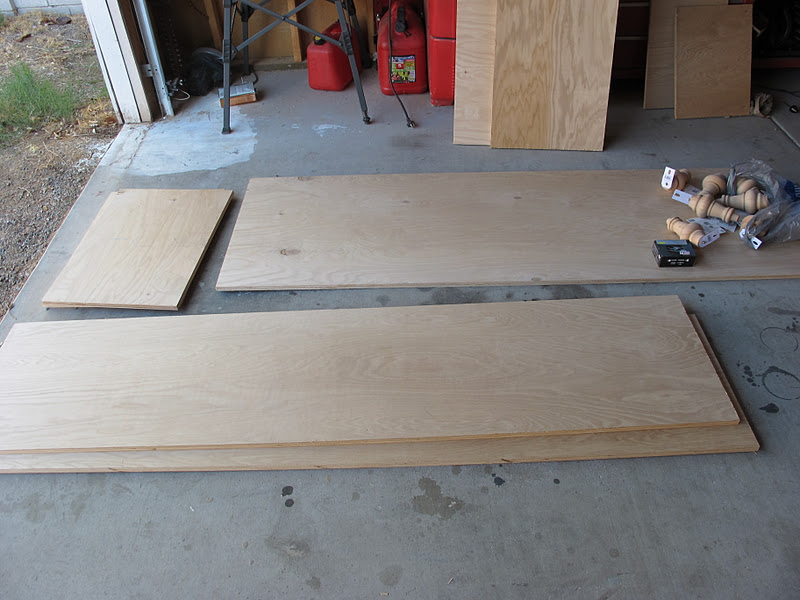
J went to Lowe’s and had some oak plywood cut to size. J needed 2 4’X8′ sheets of plywood and had 5 pieces cut; 1 bottom, 1 top, 1 back, and 2 side panels.
We used the same legs and trim as we did on our last one. So J purchased 8 legs and 8 leg plate attachments.


We mapped out where the legs were going to go and attached them to the underside of the bottom piece of plywood.


Once all 8 legs were attached it was time to start attaching the sections one by one (or 2×2, math joke :))
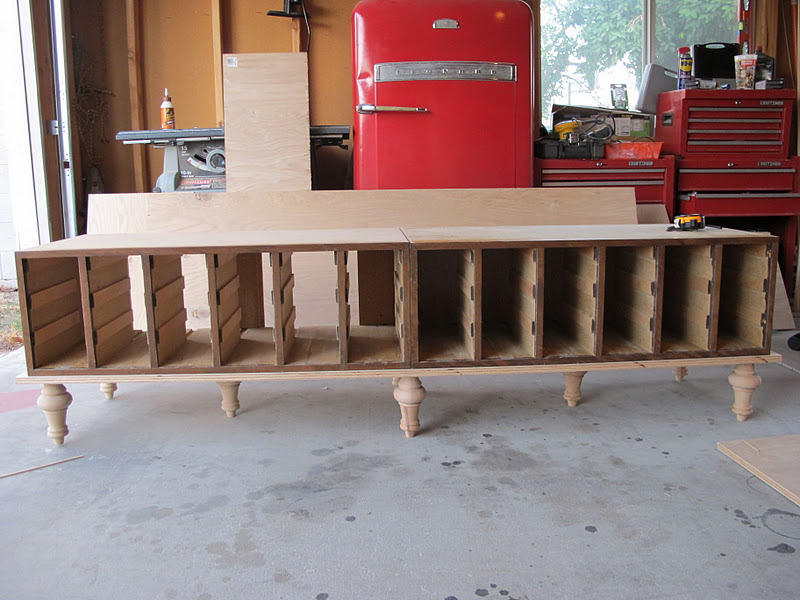


Once the sections were attached to each other and the base, it was time to attach the back, sides, and finally the top. All pieces were attached by screws from the inside of the cabinet.

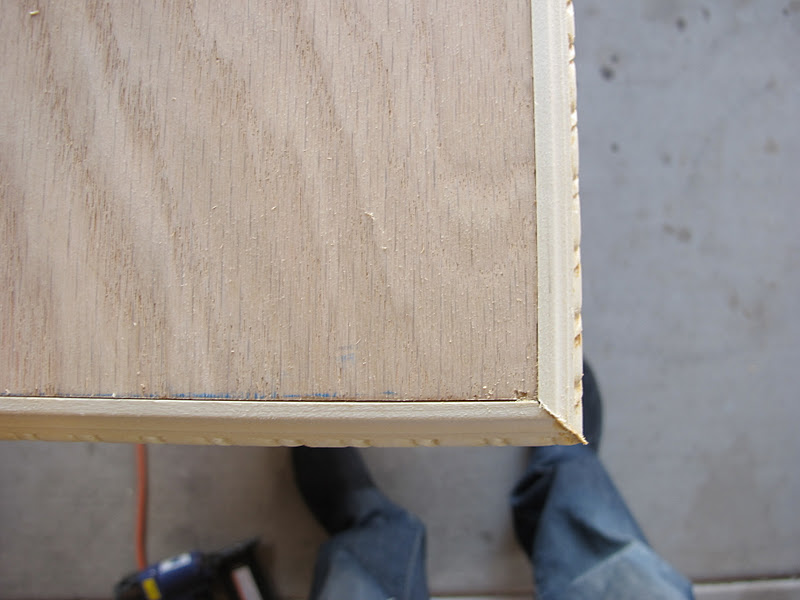
Stainable rope trim was purchased from Lowe’s and attached with wood glue and our nail gun.


Once everything was attached and all the gaps were filled with putty and sanded it was time to stain the piece. We were very worried that we wouldn’t be able to match the stain of the drawers but after testing a few out we decided that the dark walnut minwax stain matched well enough. so we started applying.


Moving it to Modern Manor was the only difficult part of this process, since we worked out all the unknowns on our first attempt. This thing weighs like 400 lbs and it tough to move, but we used one of our local moving companies Greensboro and were happy to save our backs. We were so happy to not have to paint each drawer and be able to finish this in just a few hours instead of multiple days like the first one. Also we were even more surprised when this sold so quick, guess its a little credit to our ability and a little credit to MM for having awesome customers who jump at cool pieces.
So what do you guys think? Like it better or worse than ours? What should we do for the third one, J is thinking of painting the outside of the third a crisp shiny white and leaving the wood tone in the middle for a nice contrast. Any other ideas?

umm….I’m pretty sure I need one of these in black for my dining room! So pretty and rustic looking. Swoon!
First, love the new look of the blog. Second I love that you stained this one. It looks gorgeous. Great job. I can’t wait to see the next one.
Seriously, this is one of the most fabulous pieces of furniture ever. I absolutely love this look!!
Looks gorgeous! The stain matches great! I wouldn’t have notcied it was different if you hadn’t mentioned it.
Laura
http://www.happyroost.blogspot.com
This is beautiful! I love the dark stained wood and all the tiny drawers! Y’all are so creative.
So glad to finally see this beauty up on your blog- Once again you guys rocked it!!! Thanks for the shout out! 🙂
Looks amazing, as usual! 🙂 I like the staining, it’s beautiful.
I just adore this! I want one soooo badly!
I LOVE LOVE LOVE this! Would you consider selling the third directly to ME?!
It is STUNNING! How much did it sell for??
It’s awesome! So brilliant to turn those card cabinets to a Buffett. So great love both truly. I honestly don’t think u need another design, i say stick to the two that work 🙂
Don’t you just love handyman husbands? It’s so nice!
Love it… definitely a more natural look :)agree with Kristen though, next one should be black
Im so glad yall like this one just as much! We were really happy with how close the stain is to the drawers. You really cant tell a difference at all in person! We already have another person wanting the third one, so we will see what they want- but I think they are leaning towards the stain again. We love working on these! Such statement pieces.
<3,
Adri
Love it!! Who wouldn’t want this in their house?
simply gorgeous! i found ya through European Paint Finishes…. glad i did 🙂
julie
http://www.paintedparlor.blogspot.com
love the card catalog re-do!
can you tell the selling price?
Beth, I can email you the details if you are interested. Email me at dreambookdesign@gmail.com
I am so in love with this piece, and especially your personal piece in your house. I have been looking for years to find a card catalogue like this or close to it! Where do you find so many of them?