Over this past weekend, J was able to tackle a huge project in the nursery. We have a vision of having all the walls be board and batten. In order for this {in our opinions} to look really great, the walls should be smooth to start. Also, by having smooth walls, we are able to simply paint the white for the B&B rather than hang tile backer sheets like we did in our living room. Funny/embarrassing life lesson/sad story: when we first moved in this house we hired someone to smooth out the top 1/2 of all the walls in the dining room and living room. They did beautiful work, and they charged us $1,800. No freaking joke. We had no idea what we were getting ourselves in to when we first got this house, so at that point we didn’t even ‘shop around’ for people, we just went with the first crew we saw. It seriously kills us that we paid that much, and for such a small amount of walls. A few months after that, once we were really in our groove of DIYing the crap out of our house, J attempted to smooth out our hallway walls.
Easy-peasy..and probably cost $20 for all the supplies. It’s a DIY job indeed but if you’re tackling a wall that’s suffering from damp, you’ll need to tackle that first. Start off by looking at all the Indoor Air Quality Testing Sacramento has to offer if you’re in Sacramento, or if you live somewhere else you should be able to easily find a similar service. Air quality testing can reveal if you’re living with mold – a sure sign of excess moisture in the walls.
If you find that your walls are damp, you’ll need to bleach them to kill any mold spores and then dry the wall with a dehumidifier. You may need to hire a professional (such as https://moldremediation.io) to assist with this. Find and fix the source of the damp too, like a missing roof tile or leaking pipe, otherwise, it’ll keep coming back. You might also find that your walls have been ravaged by pests like woodworm or termites, which you’ll want to sort out professionally before starting any home improvement work – check out EconomyExterminators.com to see what services they can off you.
Our whole house has fairly textured walls. Im not talking popcorn status, but definite texture. The nursery is no different, so J had his work cut out for him. Here is what we were working with:

Our process is simple:
- Begin by lightly scraping off any obnoxiously high bumps from the wall with your trowel

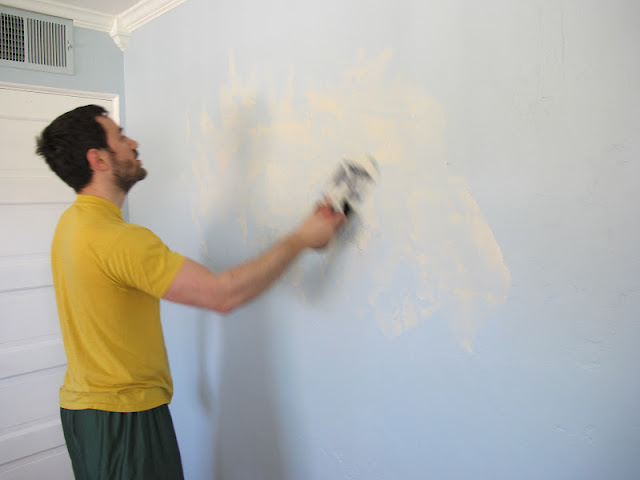
- Next, apply the plaster evenly with your trowel: {no, it is not a requirement to wear hideous outfits while doing said step, its just what we prefer over here..love you J!;) J used a rounded trowel and went in a semi circular motion when applying the spackle. The key is to fill in the low spots or holes and any high spots can be sanded down later.

- Next, before plaster has much time to dry, we rubbed the walls with a damp sponge. A lot of tutorials that we had read didn’t say to do this, but we thought it would help to spread the plaster a little more evenly in the tiny bumps. Turns out, the others were right with not doing this, because it didn’t help much! You can ignore this step altogether, but just wanted to share with you what we did:)

- Now the toughest part, wait for it all to dry. If the room is naturally damp, you might want to look at Air Handlers that can help to circulate the air and speed up the process, otherwise, it could take a couple of weeks to dry properly. Don’t be tempted to get a hairdryer on it though! The intense heat will cause it to crack and you’ll have to start again. Our wall felt like it was taking forever that day to dry, so J gave up waiting on it and decided to do the next step the next day. You can tell when it is completely dry when 1: its dry to the touch 2: it has all turned white, instead of the off white/yellow color:

- Be sure to do this step before the next. Be sure to seal up anything and everything that you don’t want mounds of dust in. This stuff goes everywhere. We sealed the vent, the outlets, the windows, and even the door once he was in there..and it still managed to seep through the bottom of the door and go in the hallway. How the heck does dust always do that?!


- Now the strenuous part, sanding. J said it was a serious workout… I say its easy..because I didn’t do it;) We bought a sander thingie in hopes that the sanding would be more consistent throughout the walls, high and low. It took him four hours to sand the entire room. Key here is applying consistent pressure when using the sanding block thingie {you can tell a DIY blog from a professional website by the language and use of the word ‘thingie’}


Oh I love board and batten, I am so excited to see how it turns out! Also we have some walls that need smoothing out as well, so thanks for the tips! I hope you are feeling well and having a great day! 🙂
I totally agree that board and batten is best with totally smooth walls. We had to skim coat all the walls in our house when we renovated because the textures were different, even within the same room. It’s not the most fun job and it’s certainly messy, but it’s worth the work!
We have orange peel texture throughout our house. I thought it was neat at first, but now I can’t stand it. I’d love to smooth it out…someday!
Was the tile backer board easier to do? I have the top third of my textured wall painted, and we were planning on putting some kind of board on the b & b part so you can’t see the texture.
I have heavily textured walls in my house and am smoothing them out as we paint out the “Realtor Beige” with actual human-friendly colors. I use a hand-held random orbit sander with a medium to fine grit and the texture comes off like gang-busters. Makes a mess, but it’s fast. One wall I skim-coated with joint compound. Not a bad job and once you get into the groove, goes quickly. Bright, bold colors accentuate the negative of textured walls. Sand ’em down!
My sweet husband is down our soon-to-be-second-born’s nursery walls (orange peel texture) as I type this, but he’s using an electric sander. I can’t imagine how much longer it would take with the tool your husband used!
It is great to see how you dealt with your textured walls. I have smoothed out most of the walls in our house and I have to say there is something very peaceful out smooth texture! From what I am told, contractors aren’t doing texture too much any more.
I have an orange peel texture all over my house and really have grown to hate it. It even seems to pick up dust easier than flat walls do. Eventually I’m going to get rid of it, but I plan on doing it by redrywalling my entire house. At the same time I can do little things like running new electrical and installing insulation. Just having to smooth out joints of new drywall seems like a lot less work than skim coating an entire room or in my case an entire house.
I did this to my living room in the winter and you are right that dust gets everywhere! Make sure to use drywall primer paint before you paint the walls with acrylic otherwise you will have to use way too many coats of paint. Plaster sucks that stuff right up.
Yes- FOR SURE a drywall primer!Its worth it but man does smoothing them out make a mess:)
Excellent tutorial! I am currently doing our bedroom walls and the orange peel just gives me the shivers. Wish me luck!
luck sweet friend!!